This may seem really trivial, but one of the things I’ve missed from the all-in-one iMac is the ability to control the display brightness from within the OS and more specifically, the keyboard. Didn’t even think to see if it was possible to do with non-Apple external displays as I thought it was some hardware/software magic until I saw a comment on Reddit mentioning the app “MonitorControl”.
For so long it didn’t even occur to me that you could possibly turn off the power LED on the Pi at all, so it just sat there like an ominous dark glow lighting up the room every night.
Did some digging (my early Google searches revealed everyone has a different way of solving this issue, most of which don’t seem to work any more on a newer Pi) and came across this StackOverflow answer.
Beau Miles quickly became one of my favourite content creators over the past couple of years, one of those “drop everything, there’s a new video” type.
This book goes hand in hand with his YouTube channel and gives further insights into some of the things he’s done in videos. I highly recommend going through his channel and watching…well everything because it’s great…before reading it.
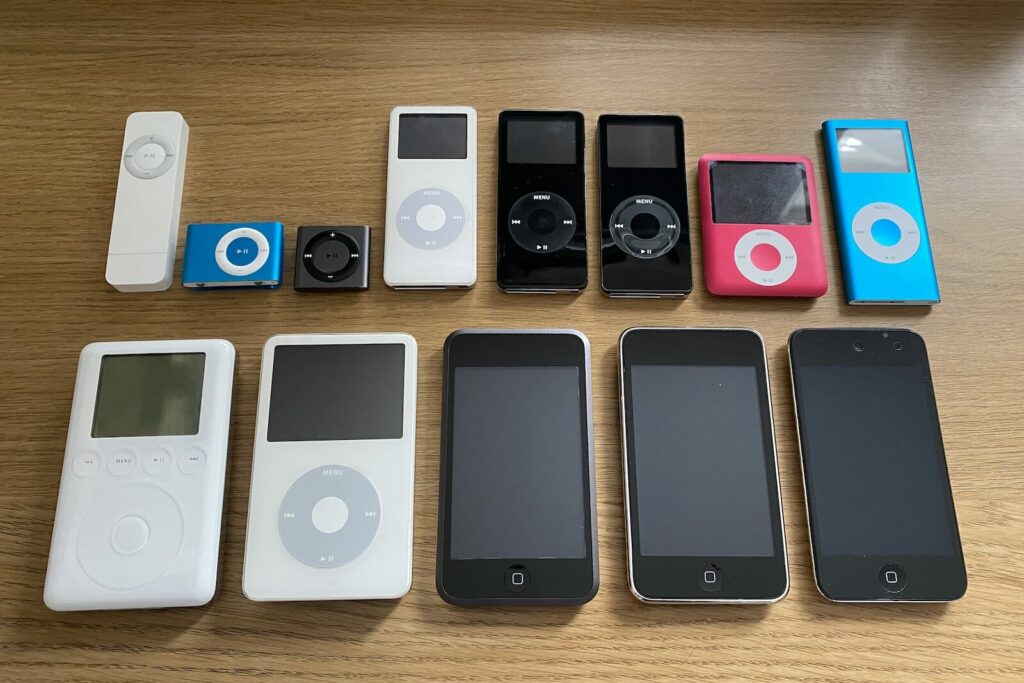
20 years ago today Apple announced the iPod to the world. I still remember getting my first iPod (the original Shuffle), such a game changing device at the time. After that I moved to the 3rd Generation Nano (The red one pictured above) and then on to the iPod touch (2nd and 4th Generations, bottom right). Since then I’ve gone on to collect a bunch more and even dabbled in bringing my 5th Gen into the modern world by swapping out the ailing 80GB Hard Drive for a 256GB SD Card, that’s a lot more than a 1000 songs in your pocket.
In my last post I talked about the “new” iMac G5 I’d acquired (knowing something was wrong) that had one of the well known/documented graphics card failures. After making that post I ordered a refurbished motherboard from The Bookyard (vintage Apple heaven) but before fitting it, we thought we’d try heating the chip up to see if re-flowing it would achieve anything, I mean hey, we can’t make it any worse…right?
Picked up an iMac G5 for dirt cheap that was listed as powering up but not outputting anything on screen, now I know the G5 had a laundry list of issues they suffered over the years but as this was a great price and came with it’s original box and accessories it was hard to pass up!
This weeks new (old) purchase was a 2006 Mac Pro (1,1) complete with a 20″ Cinema Display, keyboard and mouse. Great price for a well looked after machine and the fact the Cinema Display comes with it’s power supply is a big bonus, those things seem to be like gold dust on eBay!
I remember how unattainable these seemed when they came out, I used to go on the Apple Configurator and see just how expensive I could make these (actually, I still do that…). Always wanted one and finally found one that came up at a great price within a reasonable distance of me.
Always wanted a black MacBook (“BlackBook”) back in 2006, now I’ve finally managed to find one in great (working) condition 14 years later! Super hard to find one of these that doesn’t look like it’s been dragged behind a car and gone 10 rounds with Mike Tyson at a half reasonable price. This one seems to be all working (aside from a missing caps lock key which I ended up getting from a donor machine) and a completely dead (but original) battery. Now complete with Mac OSX Leopard (Dear Apple, please bring back the old intros ????).